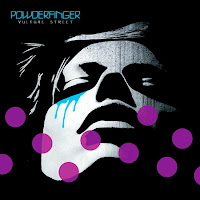
 We are going to attempt to recreate this CD cover using Photoshop.
Step 1: I cropped the Picture so that Just the Women's face is in the image
Step 2: I adjusted the Image and made it Black and White
Step 3: I adjusted the Image and posterised it, to take away the definitions in her face
Step 4: I added in the photo of the dripping blood
Step 5: Using the selection tools. I used the magic wand to delete the white background from the dripping blood image
Step 6: Using the Free transform, I adjusted the image using a mix of scale and rotation so that it fit on top of the image so that it looks like the woman is crying
Step 7: I used the rubber tool to touch up the image
Step 8: I adjusted the colour balance, and kept adding blue and Cyan until I got the desired colour
Step 9: Add in text, change colour, size and font
Step 10: I used the Ellipse drawing tool and held down the shift key in order to make a perfect circle, I then selected the colour that I wanted and made it transparent by reducing the opacity to 53%
Step 11: Duplicates the layer with the pink circle and re positioned it on the screen
By using the steps above, this was my final attempt of re creating the original album cover

No comments:
Post a Comment